

Web UI
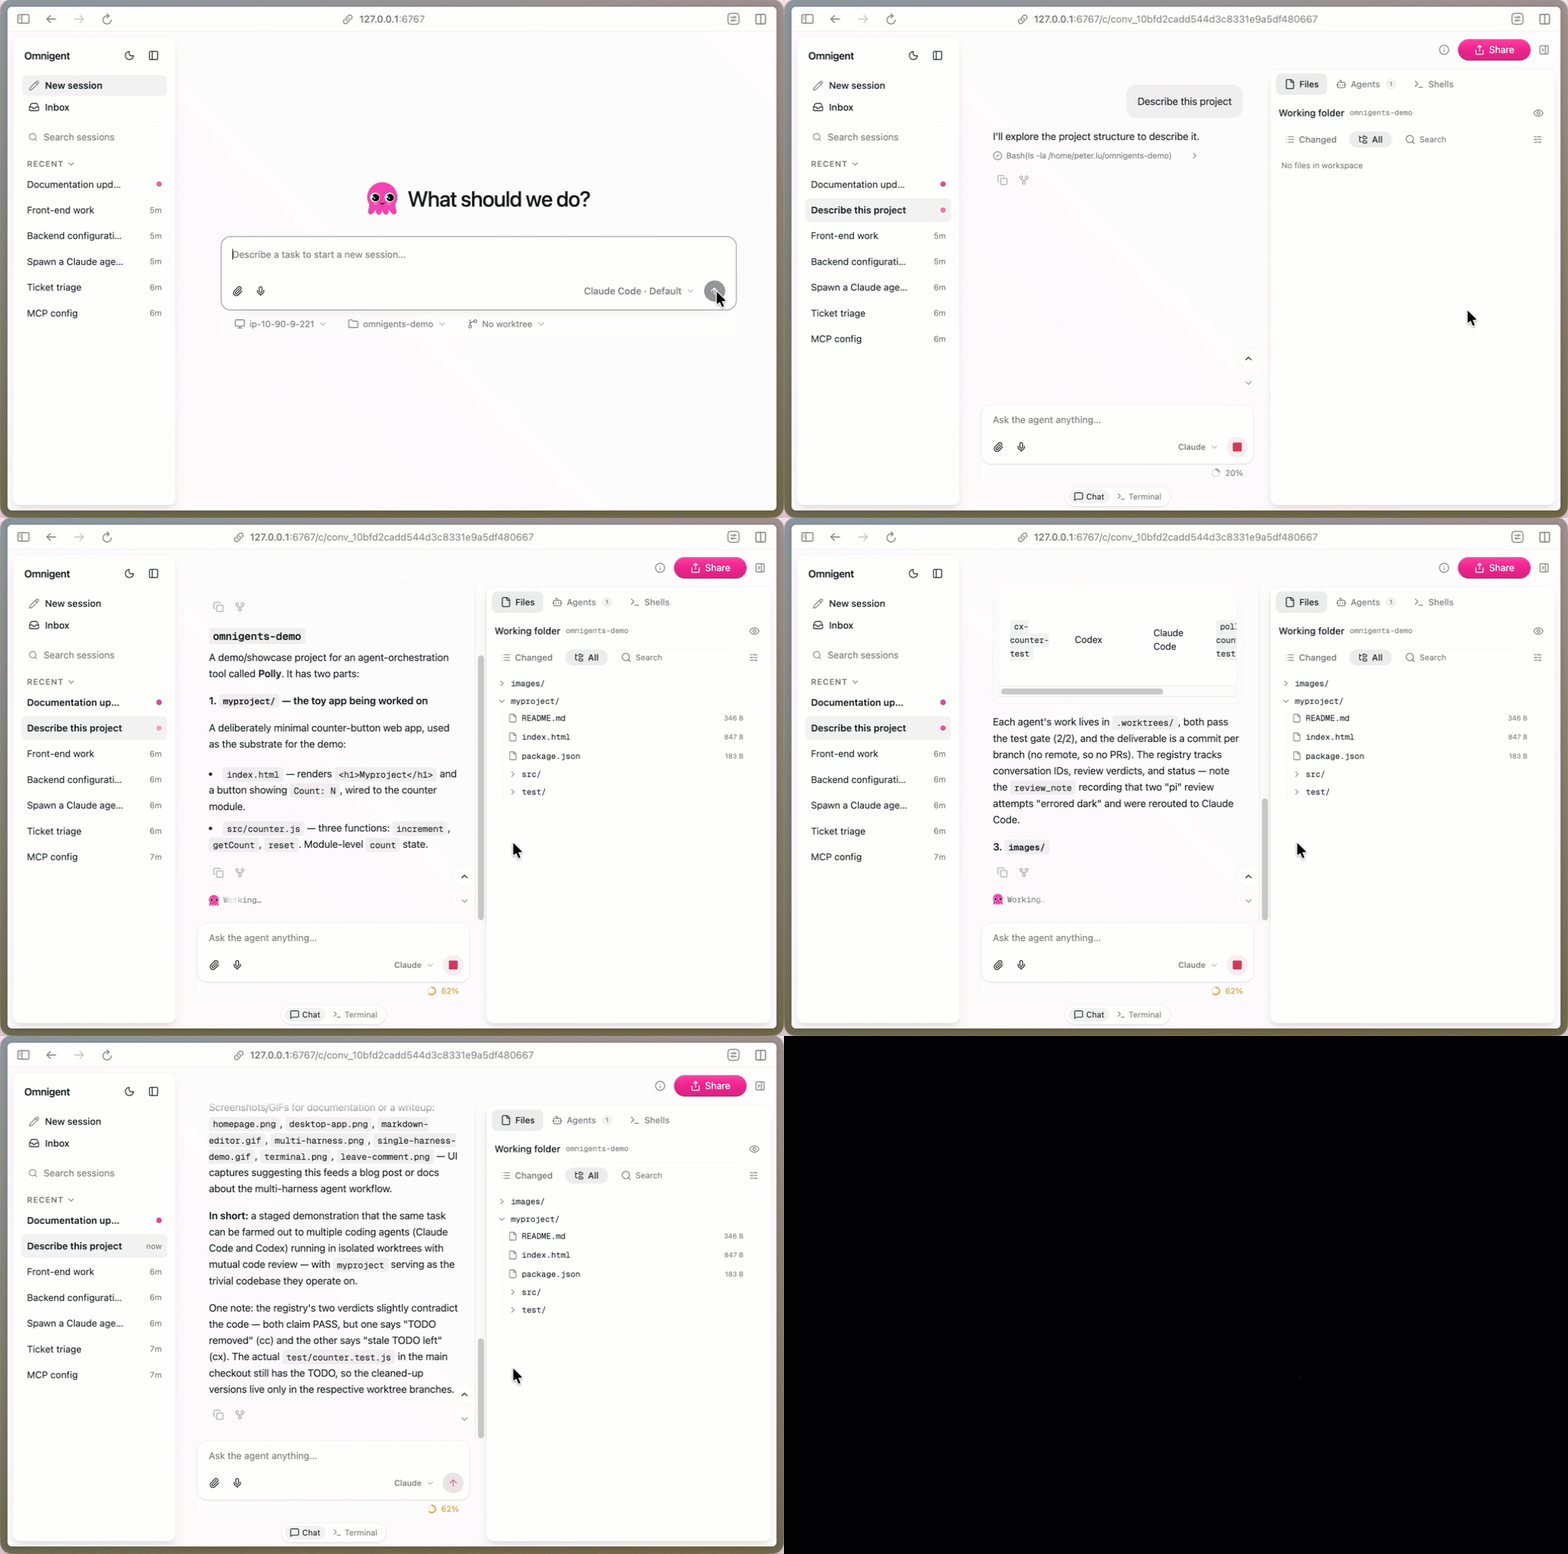
The web UI starts automatically with every session. When the server launches, the URL is printed in your terminal. Open it in any browser to get started.
Session management
See all your sessions in one place. Resume any previous conversation, start new ones, switch between them. To continue a conversation on a different agent, use Clone session to fork it and pick the new agent for the fork; a session's bound agent can't be changed in place.
Sessions persist across browser refreshes and server restarts.
Session titles
New sessions get an automatic title based on the first message. Rename a
session at any time from its ⋯ menu or header menu. To control the format of
automatic titles, configure
session_title_instructions
on the server.
To turn automatic titling off entirely, open Settings → General → Sessions and switch off Automatically name new sessions. When it's on (the default), Omnigent generates a concise title in the background after the first message of a new top-level session; turn it off to keep the default session name and rename sessions yourself. This is a per-user preference stored on the server, so it follows your account across browsers and devices.
Export a session
Save a conversation as a local file without leaving the browser: open the
session's header menu and choose Export. The transcript downloads as
<session-id>.jsonl — one JSON record per line:
- The first line is the session metadata (
record_type: "session_meta"). - Every following line is one committed conversation item
(
record_type: "item"), in chronological order. Items keep their raw API shape, so messages, code blocks, and links come through as they were stored.
This is the same format the omnigent session export CLI command produces, so
a file exported from the web UI round-trips through omnigent session import.
Long conversations are exported in full — the UI pages through the whole
history before saving. If the export can't be built, an Export failed toast
appears and nothing is downloaded.
Hide unconfigured harnesses
By default the new-chat picker lists every harness and badges the ones that aren't set up on the selected host (for example, a harness that still needs a CLI install or sign-in) so you can discover and configure them. If you'd rather see only the harnesses that can launch right now, turn on Settings › Appearance › Hide unconfigured harnesses. With it on, harnesses the selected host reports as unconfigured are hidden from the picker instead of badged — including the brain-harness override submenu of a bundle agent (though the currently selected brain always stays visible).
This is a per-device UI preference, off by default. It changes only what the picker shows on this browser — no account or host state is touched — and fails open: when no host is connected or readiness information is unavailable, nothing is hidden.
Projects
Organize related sessions into a named Project. Each project is a collapsible
folder in the sidebar, keeping a long session list grouped around the work you're
doing. Projects don't nest, and a session belongs to at most one. Grouping is the
only thing a project requires; the sessions inside it can each use whatever host,
agent, and settings you like.
Create a project from the sidebar at any time, including an empty one with no sessions yet, then move sessions into it as the work takes shape.
You can file a session into a project from three places:
- Start a new session already filed there: each project folder in the sidebar has a shortcut that opens the new-chat composer with the session assigned to that project.
- Start a sibling session from inside a conversation: type
/newin the composer (or type/n, pressTabto complete it, thenEnter; selecting /new in the slash menu's Commands list works too). This opens a blank new-session composer filed into the same project as the session you're in. See/newbelow. - Move an existing session: open the session's
⋯menu and chooseMove session, then search your projects, create a new one, or remove the session from its project.
Removing a session from a project moves the session back to Sessions section, and deleting a project archives all its sessions.
Reordering projects
Projects start in alphabetical order. To arrange them yourself, drag a
project's header up or down in the Projects list. A line shows where it will
land when you drop it.
Dragging a project switches the list to manual order. New projects appear at the end of that order.
To change how projects are sorted, open the Projects section's ⋯ menu
and choose Sort projects by:
- Alphabetically — sorts projects A→Z while keeping your manual order available to switch back to.
- Manual order — restores the order you last arranged.
Project settings and defaults
When the sessions in a project tend to run the same way, a project can store its
own default session settings so you don't re-pick them every time. Open the
project folder's ⋯ menu and choose Project settings, then set any of:
- Host the new session runs on.
- Working directory the agent starts in.
- Default agent for the session.
- Default model, shown only when the default agent is a native coding harness that takes a model choice (Claude Code or Codex). It pins the model new sessions start on — e.g. "Opus for this repo" — the same way the project pins an agent. The pre-filled model is still editable in the composer, and an explicit pick you make there wins over the project default.
- Random worktree, which branches each new session into its own fresh git worktree. This overrides the global default in Settings › Git in either direction: turn it on to force worktrees for the project, or off to opt out even when the global default is on. Left unset, the project inherits the global default.
New sessions started in that project pre-fill the composer from these defaults. Nothing is locked in: every field is still editable before you send, any default you leave unset falls back to your usual settings, and a default that no longer applies (an offline host, an uninstalled agent) is skipped rather than blocking the session. Leave the settings empty and the project stays a pure organizing tool.
New session with /new
When you're already in a conversation and want a fresh one alongside it, type
/new in the composer and press Enter. The slash menu lists it under
Commands as Start a blank session in the same project; /n followed by
Tab completes it to /new , and clicking the row runs it directly.
/new is handled by the web UI itself — it's local navigation, not a message.
Nothing is sent to the agent, the current session keeps running untouched, and
the composer is cleared. It takes no arguments: /new something shows
/new does not accept arguments and does nothing else.
Where it lands depends on the session you ran it from:
- Session in a project — opens the new-session composer pre-filed into that project, so it picks up the project's settings and defaults. The working directory follows the project's defaults, not the old session's.
- Session not in a project (or whose project has since been deleted) — opens the plain, unfiled new-session composer.
- Project can't be looked up (for example, the server is temporarily
unavailable) — you stay in the current session and a toast reads Couldn't
open a new session in this project. Please try again. Running
/newagain retries the lookup rather than reusing a stale project name.
This is the same destination as ⌘⌥N and the command palette's new-session
action, with the current project carried over.
Worktree branches
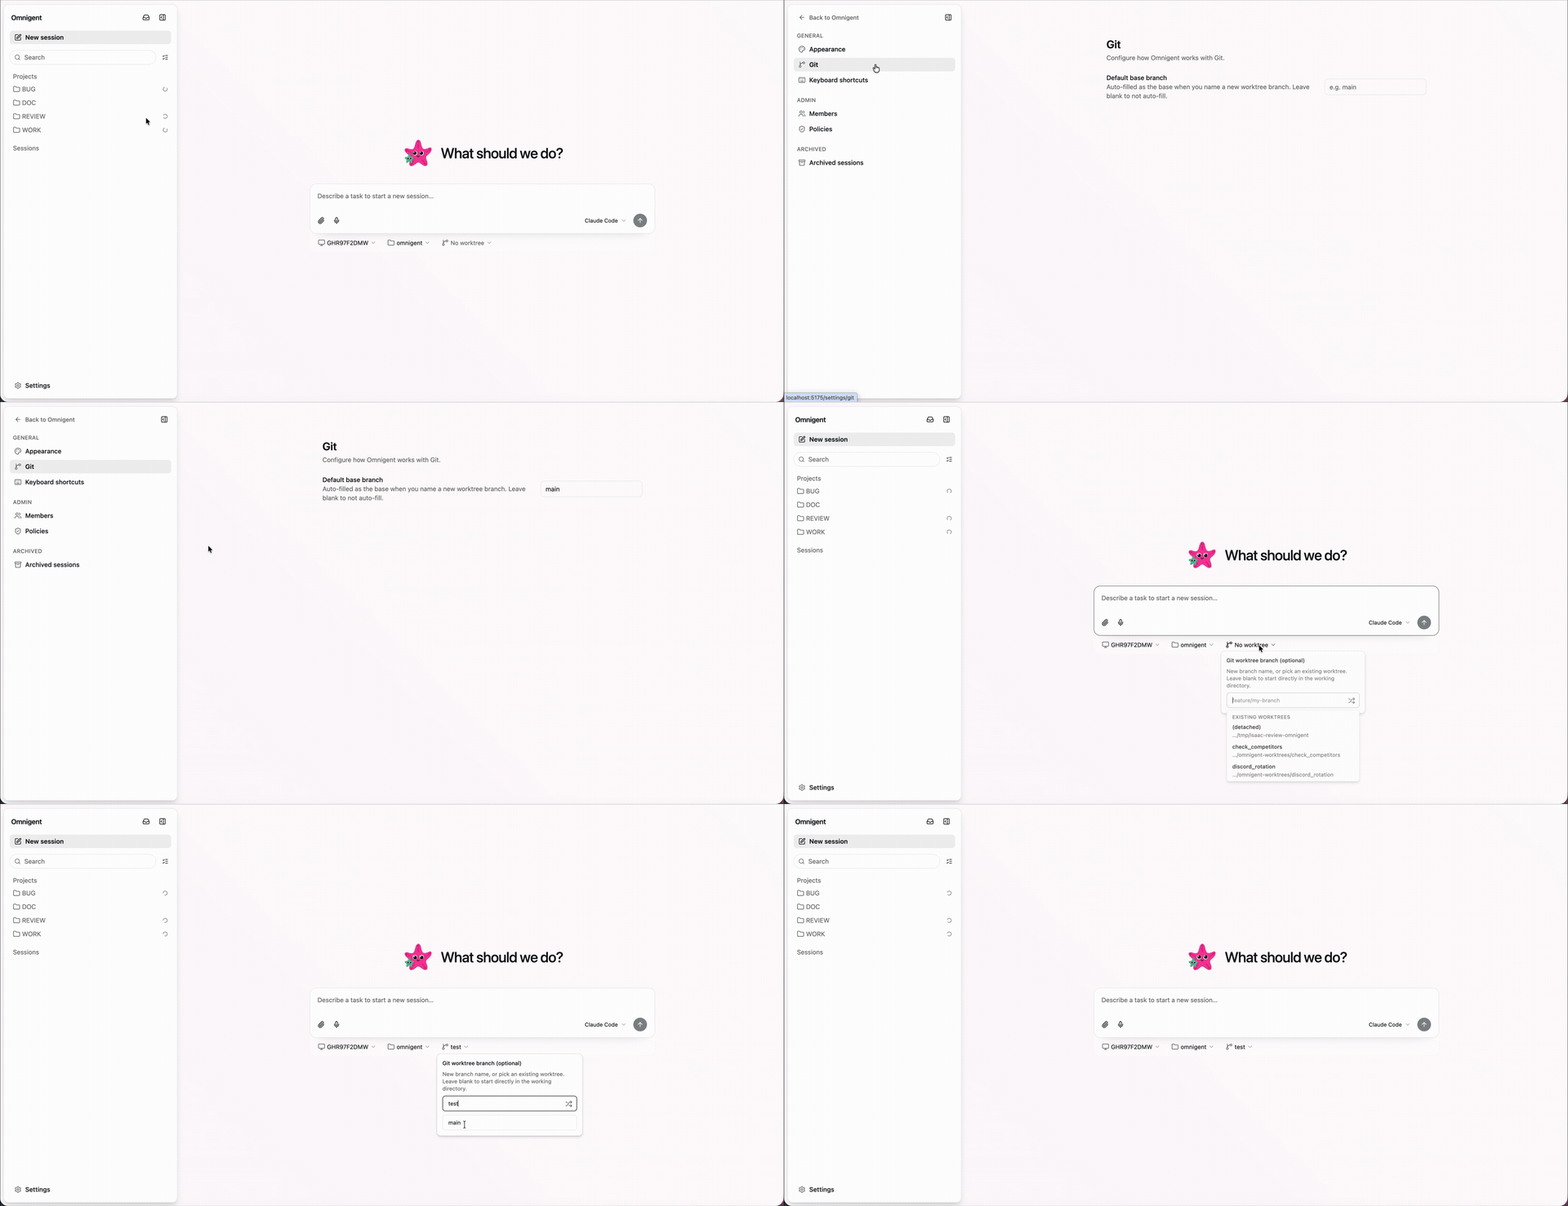
In the new-chat composer, name a branch to run the agent in its own git worktree. Naming a branch reveals a base branch field, the branch the worktree is cut from. Leave it blank to branch off the workspace's current branch.
To avoid retyping the same base, set a Default base branch under Settings › Git. The composer then auto-fills that value whenever you name a new worktree branch; leave the setting blank to turn auto-fill off.
To always start new sessions in a fresh worktree, turn on Always use a random worktree under Settings › Git. When it's on, the composer seeds a fresh randomly-named worktree branch for any new session that lands in a git workspace, so you don't have to name a branch each time. It's off by default.
A project's own Random worktree setting overrides this global default in either direction — a project can force worktrees on, or opt out even when the global default is on. Only projects that leave the setting unset inherit the global default.
Choose the launch model
Native coding-agent sessions carry a per-session Model picker in their
launch config, next to the harness's other launch knobs. Both Claude Code
(claude-native) and Codex (codex-native) surface it: open the agent's config
in the new-chat composer and pick the underlying LLM the harness launches with.
The choices come from the selected host's resolved model catalog, so the list
reflects the providers and credentials configured on that machine. The first
option is Default — labeled Default (<model-id>) when the host reports a
default model — which leaves the harness on its own configured/default model.
Leaving the picker on Default omits the override entirely.
Your choice is remembered per harness, so a model picked for Codex doesn't change the model remembered for Claude Code (and vice versa). When you start the session, the selected model rides along as the launch override and the runner uses it at launch. Under a sandbox launch, where no host catalog is resolved, the picker is empty and the harness default is used.
A project's stored Default model (see Project settings and defaults) outranks the remembered per-harness pick while the composer sits on the project's default agent, so a project can pin its own launch model. It only applies when the stored model is still a valid choice for that harness; a retired or unknown id falls back to your remembered pick. An explicit model you pick in the composer always wins for that session.
Change reasoning effort mid-session
Custom agents running on the claude-sdk or codex harness get an in-session
Effort dial in the composer. Open the config gear, choose Edit, and pick
a rung from the Effort section. The ladder is the harness's declared effort
family, read from the server's harness catalog (/v1/harnesses →
capabilities.effort):
claude-sdk(anthropicfamily):low,medium,high,xhigh,max.codex(openaifamily):none,minimal,low,medium,high,xhigh.
The pick is saved on the session's reasoning_effort right away — no turn has
to be sent — and is restored when you reload the page. Changing effort after a
completed turn applies on the next conversational turn and keeps the
conversation history. On claude-sdk, effort is a launch option, so Omnigent
rebuilds the SDK client with the history replayed; /compact still operates on
the existing client's context. /effort default drops the override and
restores the harness's default. On codex, restoring the default re-applies
the thread's original effort; if the Codex app-server reports no default for
the model, the turn fails with an error asking you to select an explicit effort
or start a new session.
This is the in-session dial, distinct from the effort choice in the new-chat
composer. It appears only on top-level sessions (a sub-agent child takes no
input of its own, so it gets no dial) and only for harnesses that declare an
effort ladder — antigravity declares none, so its sessions show no dial.
Native TUI sessions (claude-native, codex-native, …) keep their own effort
controls.
Set what the agent can do without asking
Native coding-agent sessions choose their permission or approval mode from the composer's permissions dropdown — the hand icon next to the input — not from the picker's Edit menu. The Edit menu keeps the model and effort choices; Advanced settings now appears only for agents that have a configurable underlying harness (a bundle agent whose brain harness you can override). The options in the dropdown depend on the selected harness:
- Claude Code (
claude-native) offers its permission modes (for example Accept edits or Bypass permissions). The pick rides along as--permission-mode. - Codex (
codex-native) offers its approval presets — Default, Full access, and Read only — plus the most-permissive Bypass approvals & sandbox option. Full access launches Codex with--sandbox danger-full-access --ask-for-approval never; the bypass option maps to Codex's--dangerously-bypass-approvals-and-sandboxstance and is create-time only (a running Codex session switches approvals through its own/permissionspopup, which has no bypass row). - Cursor (
cursor-native) offers its execution mode, such as Plan. - Antigravity (
antigravity-native) offers Ask every time or Skip permissions. Skip permissions is a dangerous bypass that runs the session with all tool prompts disabled; while it's selected the composer shows a red warning banner. Under Ask every time, each Antigravity permission prompt appears as an approval card in Chat and in the Inbox, including agy's pattern-scoped always-allow choices — see Antigravity permission prompts.
Your choice is remembered and seeds the next new session, the same way the model picker is remembered.
Choose MCP services before launch
On a server whose administrator publishes an MCP registry, the new-chat composer
lets you pick server-configured MCP services for the session before you launch
it. Open MCPs (the plug icon) in the workspace bar above the composer — the
same bar as the working-directory and worktree chips — and the Tools for this
session panel lists the catalog. Turn a service on or off with its switch; the
chip reads MCPs · N while services are selected. When the bar runs out of
room the label collapses and only the plug icon remains.
Each row shows the service's connection state:
- Ready — the service needs no account and can be used as-is.
- Connected — your account is already linked.
- Needs sign-in — turning the service on opens a sign-in popup; the service is selected only once authorization succeeds, and the Send button stays disabled (Finish signing in to the MCP service…) until then. Cancelling leaves it off.
- Connect your account in settings — bearer-token services can't be turned on until you connect them under Settings → MCP, reachable from the Manage MCP accounts link at the bottom of the panel.
- A custom server already uses this name — the agent's own MCP configuration already declares a server with this id, so the registry entry can't be added.
Turning a service off removes it from this session only; the saved account stays
connected. The selected ids ride along on session creation as
mcp_registry_services, so the first turn can use the tools without a second
attach or restart step. Selection is per session, not a host- or sandbox-wide
default.
Remembered selections. The composer remembers your explicit choices in this
browser and applies them to the next new session — including choosing none. An
unsent draft takes precedence over the remembered set. The preference applies
across projects on the same browser origin, stores service ids only (never
credentials), and a fresh browser starts with nothing selected. Existing
sessions keep their own selection; changing the remembered set never touches
them. Working-directory .mcp.json files are not read for automatic selection.
When remembered selections are restored, launch waits for the catalog to load (Loading MCP services…). If the catalog can't be loaded, sending is blocked with Could not load MCP services. Open MCPs to retry.; open the panel and choose Retry. Ids that are no longer in the catalog are filtered out of the launch request without clearing your stored preference, and the panel lists them as No longer available · turn off to remove. A restored service whose connection has expired is called out in amber: the chip appends · N needs sign-in, and the row offers Reconnect — reconnect it or turn it off before launching.
The MCPs control appears, and the catalog is requested, only when the server
advertises the mcp connection capability; on other servers the composer shows
no picker.
Shared sessions
On a multi-user server the sidebar splits your session list across two tabs:
- My sessions — the sessions you own. This tab keeps the full sidebar
structure: the
Pinnedsection,Projectfolders, and theSessionslist. - Shared with me — a flat list of sessions other people have shared with you.
Browser-first mode
If you prefer to work in the browser rather than the terminal UI, one command starts everything and returns:
omni host --background # start the local server + host daemon, then return
--background spawns the host daemon as a detached process instead of running
it in the foreground. In local mode (no server URL) that daemon also owns the
local Omnigent server, so this single command is the whole "start everything"
step: it starts (or reuses) the local server, waits for it, and prints the
server URL along with the daemon's pid and log path. It reuses a healthy daemon
if one is already up rather than double-registering the machine.
Open the printed URL (by default http://localhost:6767) and drive the agent
entirely from the browser; no further terminal interaction needed. Stop the
daemon later with the omni host stop command it prints.
Sign-in still happens in the foreground, before the spawn: pointing
--background at an authenticated remote server (for example
omni host --background --server https://your-server.databricksapps.com) runs
the browser login in your terminal first, since the detached daemon has no
terminal to prompt on.
Keyboard shortcuts
The web UI ships a set of global keyboard shortcuts. Press ⌘/ (Ctrl+/ on
Windows/Linux) at any time to open the in-app shortcuts overlay, which lists the
current bindings for your platform. Many controls also show their shortcut
inline: hover the sidebar's collapse, Search, or Settings button or a
Workspace tab, or open the Workspace rail's + menu, and the keycaps appear
in the tooltip or menu row.
Platform-aware modifiers
Each global shortcut is bound to a single command modifier per platform, and only that modifier fires it:
- On macOS the shortcuts use ⌘, and only ⌘ triggers them. The Ctrl
variant — and a combined ⌘+Ctrl chord — is inert, so Ctrl-based
readline/emacs editing keys (
Ctrl+A,Ctrl+K, …) keep working in the composer and terminal. - On Windows/Linux the shortcuts use Ctrl, and only Ctrl triggers them.
Exceptions: Ctrl+Shift+M (model picker), Ctrl+Shift+L (focus chat input), and Ctrl+Tab (desktop recent sessions) use Control on every platform.
What you see in the shortcuts overlay is what fires: the overlay shows ⌘ on macOS and Ctrl elsewhere.
Switch sessions
Move between sidebar sessions without leaving the composer:
- Previous session —
⌘[(Ctrl+[) - Next session —
⌘](Ctrl+])
The selection wraps at the ends of the list. The bracket chords carry no
text-editing meaning, so they fire even while the composer is focused; inside a
terminal or the code editor — which bind ⌘[ / ⌘] themselves (indent/outdent,
or forwarding to the PTY) — the shortcut yields to that surface.
In the desktop app, Ctrl+Tab
additionally opens a switcher over your five most recent sessions.
Find a session by name
Press ⌘⌥S (Ctrl+Alt+S on Windows/Linux) to jump straight to the
Switch session picker — a name-only search over your sessions. Type part of
a session's title and the list fuzzy-matches it (for example, fxprs finds
“Fix the parser”); press Enter to open the top match. The chord fires even
while the composer is focused and leaves any unsent draft untouched when you
Escape out; inside a terminal it yields to that surface.
This picker lists sessions only — no commands or actions. It complements the
command palette (⌘K), which searches sessions and runs commands. The
search loads more sessions as you narrow the query; when there are more matches
than fit, a Search older sessions control pulls in older pages.
Workspace sidebar and tabs
⌘⌥] (Ctrl+Alt+] on Windows/Linux) is a keyboard path into the right
Workspace rail rather than a plain toggle:
- Pressed from anywhere outside the rail, it opens the rail if it's collapsed (or hidden behind the Terminal panel) and moves focus into the rail's tab strip, landing on the currently selected tab. If the rail is already open, it only moves focus there. Reopening brings back the file you last had selected.
- Pressed while focus is already inside the tab strip, the same chord closes the rail — so two presses in a row open and then close it.
Once the tab strip has focus, press a plain digit to jump to one of the
pinned tabs: 1–4 select Files, Changes,
GitHub, and Agents in the order they appear in the strip. Your
Default Workspace tab comes first when it's
available, and tabs that aren't available in the session (GitHub outside
coding-agent sessions, Files/Changes without an on-disk workspace) or that
you've unpinned are skipped so the numbers stay contiguous. Hover a tab to see its number in the tooltip.
The digits only act while the tab strip is focused, so typing numbers in the
composer, the editor, or a terminal is unaffected.
Other global shortcuts
| Action | Shortcut |
|---|---|
| Open the command palette | ⌘K (Ctrl+K) |
| Find a session by name | ⌘⌥S (Ctrl+Alt+S) |
| New session | ⌘⇧O (Ctrl+Shift+O) |
| Open Settings | ⌘⌥, (Ctrl+Alt+,) |
| Open the model picker | ⌃⇧M (Ctrl+Shift+M on every platform) |
| Focus the chat input | ⌃⇧L (Ctrl+Shift+L on every platform) |
| Toggle the left (Conversations) sidebar | ⌘⌥[ (Ctrl+Alt+[) |
| Focus or close the right (Workspace) sidebar | ⌘⌥] (Ctrl+Alt+]) |
| Select a Workspace tab | ⌘⌥] then 1–4 (Ctrl+Alt+] then 1–4) |
| Open a new browser tab (desktop app only) | ⌘⌥B (Ctrl+Alt+B) |
| Open a new shell | ⌘⌥T (Ctrl+Alt+T) |
| Toggle voice dictation | ⌘⌥V (Ctrl+Alt+V) |
| Approve a pending request | ⌘↵ (Ctrl+Enter) |
| Show the shortcuts overlay | ⌘/ (Ctrl+/) |
⌘⌥N opens a clean, focused new-session composer from any page — the same
destination as the command palette's new-session action. Inside a conversation,
typing /new in the composer does the same while
keeping the new session in the current project. ⌘⌥, jumps straight
⌘⇧O (Ctrl+Shift+O on Windows/Linux) opens a clean, focused new-session
composer from any page — the same destination as the command palette's
new-session action. It fires even while the composer is focused, and any unsent
draft in the session you left is kept. The chord matches the O character your
keyboard layout types, so it follows the key labeled O on non-QWERTY layouts.
The desktop app keeps ⌘⌥N
(Ctrl+Alt+N) for this action instead. When the web UI is embedded in another
page, the shortcut only fires while focus is inside the Omnigent app, so the
host page keeps its own keys. ⌘⌥, jumps straight to Settings from anywhere in the app. ⌘⌥B is available only in the
desktop app, where the embedded
browser lives; the shortcuts overlay lists it only there.
Ctrl+Shift+M is the keyboard equivalent of typing /model in the composer: it opens
the model picker without leaving the keyboard. It works both in an existing
session's composer and on the new-chat screen, where it opens the agent/model
picker and drills straight into the selected harness's model submenu. The chord
fires only when a model picker is available to open (it stays inert while the
composer is read-only, the session is unreachable, or config is busy), and it
yields to surfaces that own their own keys, such as the terminal and the code
editor.
Jump straight to a pinned session with the command modifier plus a digit
(1–9 for the first nine, 0 for the tenth). In a browser tab — where plain
⌘/Ctrl+digit is reserved for native tab-switching — the binding adds Alt
(⌘⌥1…, Ctrl+Alt+1…); the installed desktop app uses the plain ⌘1… chord.
Canvas
The Canvas page gives you a spatial view of your work: instead of the linear sidebar list, your top-level sessions appear as draggable cards you can arrange freely on an infinite canvas. Sessions are grouped by project, with one canvas per project, so each project keeps its own layout.
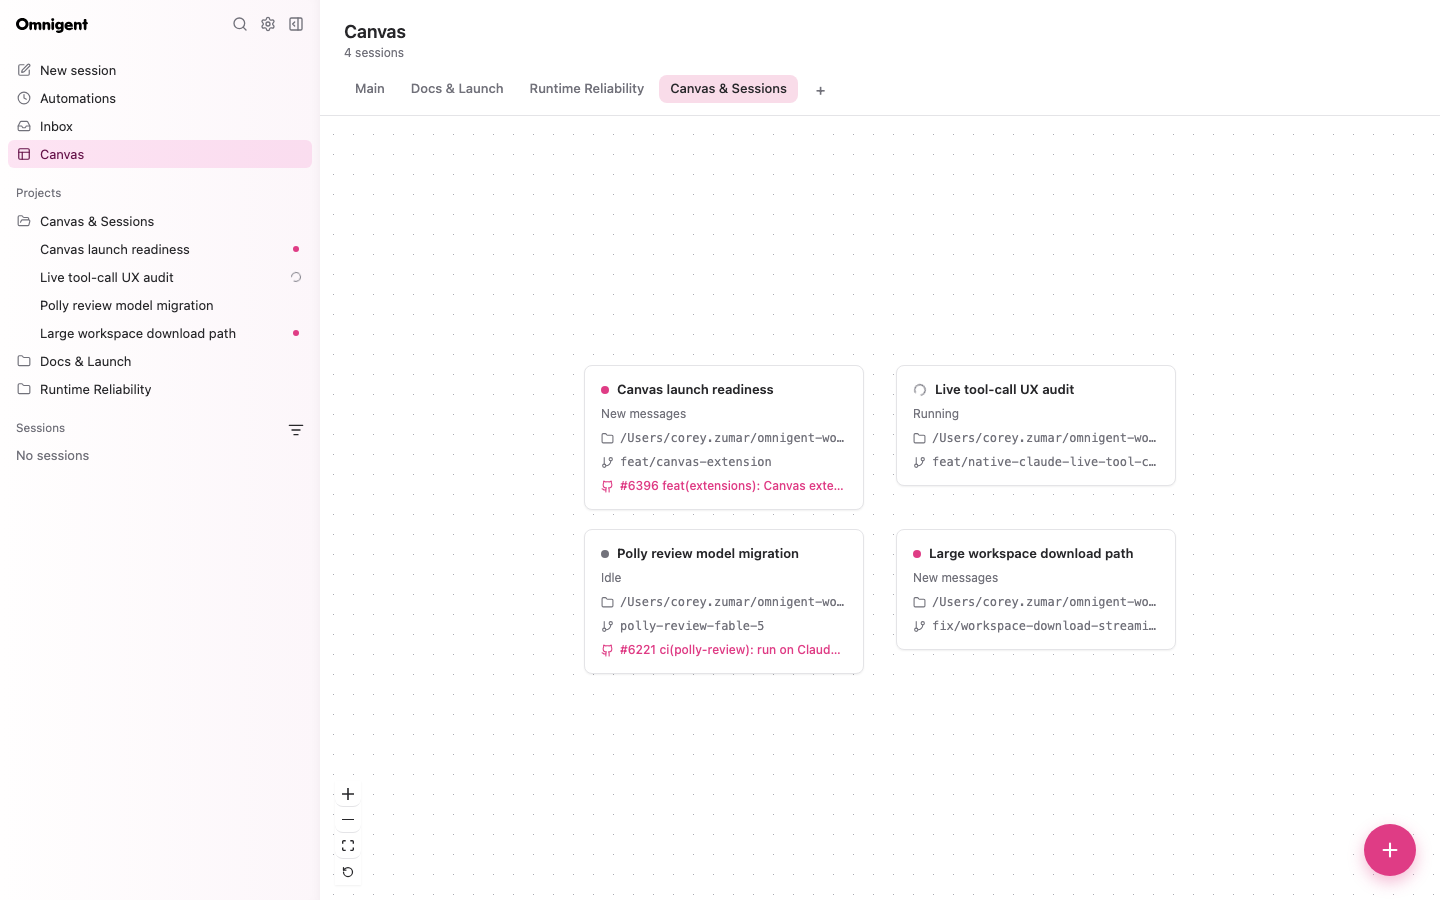
Canvas is off by default. It's a gated release feature: an operator enables
it deployment-wide by including canvas in the server's release features
(OMNIGENT_FEATURES=canvas, or --features canvas on a Databricks deploy —
combine comma-separated with other features like usage_page,harness_install;
see Release features).
Once enabled, a Canvas entry appears in the sidebar navigation and the page
is served at /canvas.
Install as an app
The web UI is an installable Progressive Web App (PWA). From a supported browser you can install Omnigent to your desktop or phone home screen and launch it in its own standalone window—no separate download or app store required. Look for your browser's install control (for example, the install icon in Chrome's address bar, or Add to Home Screen on mobile).
Installing is optional: the web UI works exactly the same in a normal browser tab. Because Omnigent is a cloud app with no offline mode, the installed app still requires a connection to your server—it does not cache pages for offline use.
Appearance
Open Settings → Appearance to change how the web UI looks. Two controls sit side by side:
- Mode — light or dark.
- Color theme — a dropdown of palettes that restyle the whole UI:
- Omnigent — the default brand look.
- Dracula
- GitHub
- Catppuccin
- Gruvbox
- Nord — arctic frost blues over polar-night neutrals.
Your mode and palette choices are remembered in the browser and reapplied on your next visit. Picking Omnigent clears any palette override and returns to the default look.
Workspace panel default
New chats start with the right Workspace rail collapsed by default, so a
session stays visually stable while its runner and workspace hydrate. Expand it
at any time from the header's Expand right panel control, or press
⌘⌥] / Ctrl+Alt+], which opens the rail and focuses its tab strip (see
Workspace sidebar and tabs).
To make new chats open the rail automatically instead, set the Workspace panel default in the Workspace group under Settings → Appearance to Open. The two choices are Open and Collapsed. This is a per-device browser preference that only seeds sessions with no saved open-state — once you expand or collapse the rail in a given session, that session keeps its own remembered state regardless of the default.
Pin Workspace tabs
The right Workspace rail's built-in pages — Files, Changes, Pull Requests (the GitHub tab), and Agents — are all pinned to the tab strip by default. To declutter the strip, open the Workspace group under Settings → Appearance and use Sidebar tabs to toggle each page between Pinned and Pin. A Sidebar preview shows which icons the strip will display.
Unpinned pages stay one click away in the rail's + (Open new) menu,
listed above the browser, side-chat, and shell entries. Choosing one opens it
as a closable tab next to your file, shell, and side-chat tabs; close it with
its × button or a middle-click. Each session remembers which unpinned pages
you opened. Sessions that had a page selected when you unpin it forget that
selection and reopen on your default tab instead. If you unpin everything and
haven't opened a page, the rail shows Open a Workspace tab from the + menu.
Pinned tabs are a per-device browser preference, included in settings export and import.
Default Workspace tab
Choose which tab the right Workspace rail opens on first. In the Workspace group under Settings → Appearance → Default Workspace tab, pick one of your pinned pages:
- Files — the default.
- Changes
- GitHub
- Agents
Only pinned pages are offered, and the control is hidden when no page is pinned. If your saved default is unpinned, the first pinned page is used instead.
The tab you pick is shown first in the rail; the remaining tabs keep their relative order. Changing this default also updates existing chats when they're reopened or refreshed, without closing their open file tabs or changing the rail layout. Any manual tab choice you make in a session afterwards is remembered for that session and wins over the default, and file links still open the linked file regardless of the setting.
This is a per-device UI preference stored in your browser. If a chosen default tab isn't available in a given session (for example, GitHub only appears in coding-agent sessions, and Files/Changes need an on-disk workspace), the rail falls back to the first available tab.
File editor
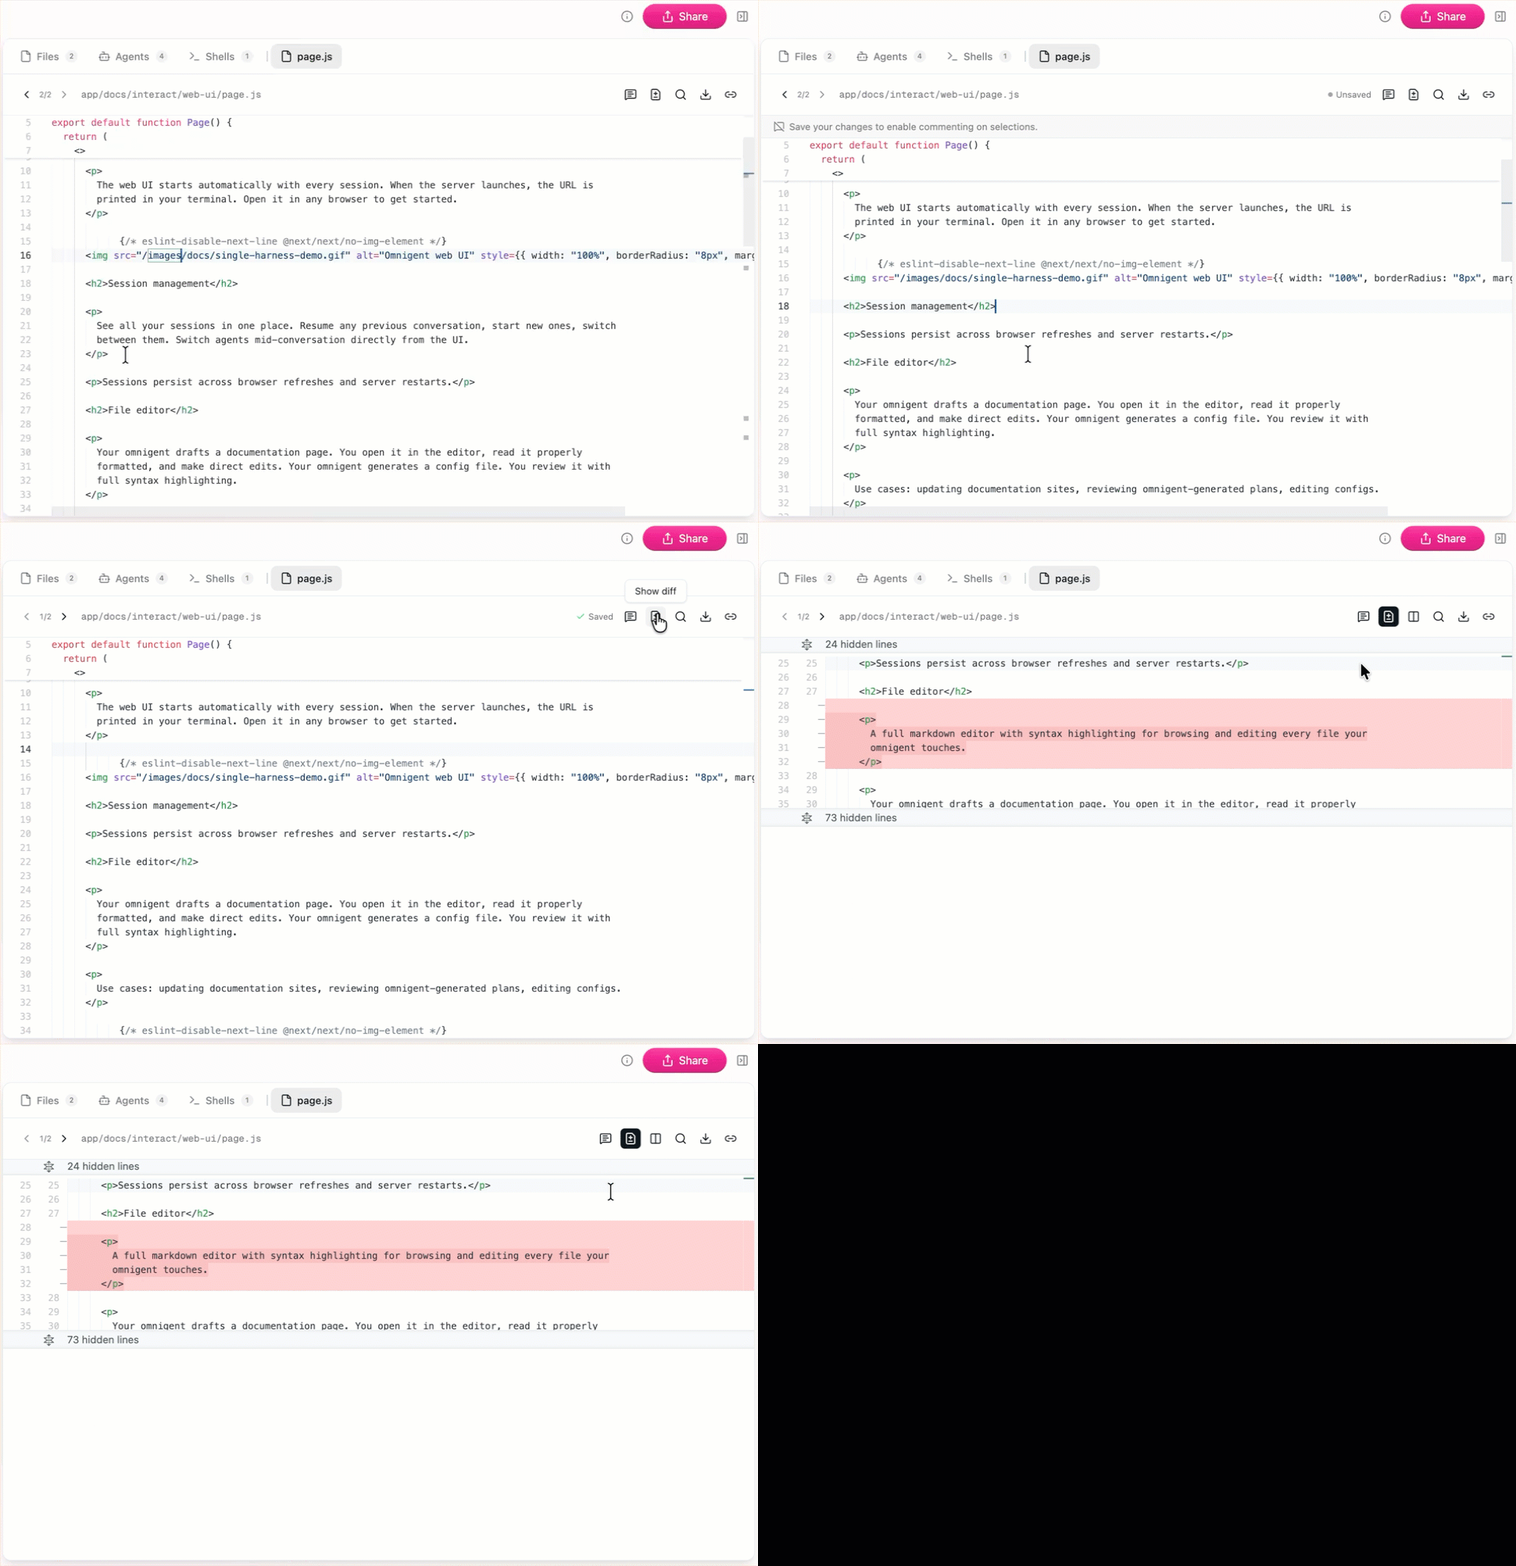
A full markdown editor with syntax highlighting for browsing and editing every file your Omnigent touches.
Your Omnigent drafts a documentation page. You open it in the editor, read it properly formatted, and make direct edits. Your Omnigent generates a config file. You review it with full syntax highlighting.
Use cases: updating documentation sites, reviewing Omnigent-generated plans, editing configs.
Code viewer and diffs
Review what your Omnigent changed before accepting. Syntax-highlighted diffs show exactly what was added, modified, or removed.
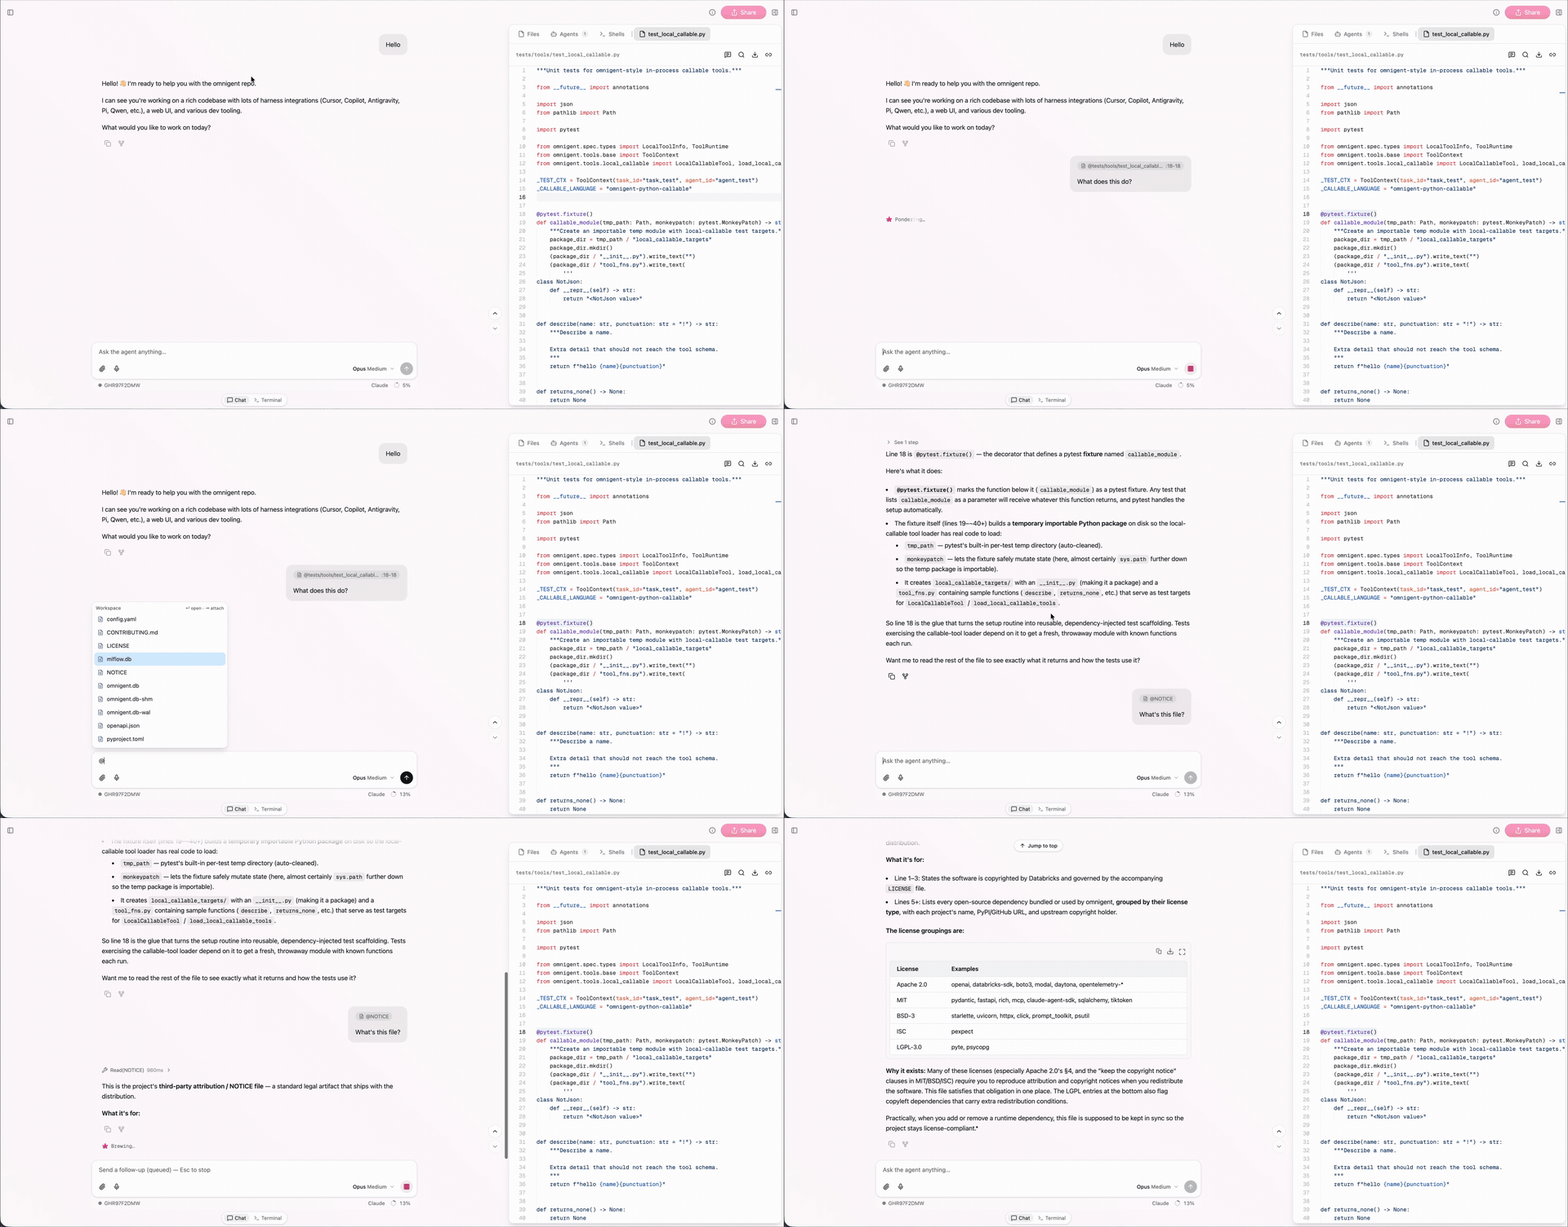
Attach a selection to the agent
In a coding-agent session, select lines in the code viewer or a diff and an
Attach to agent button appears next to Add comment. Clicking it drops the
selected line span into the composer as a chip (shown as @path:start-end),
so you can ask the agent about an exact range without copy-pasting it into chat.
The chip is delivered to the agent at send time as a path reference — the agent
reads the on-disk file directly (no upload). This button shows only for native
coding-agent sessions, since those harnesses run in the workspace and resolve
the referenced file themselves.
GitHub
Coding-agent sessions have a Pull Requests tab in the right workspace rail. It tracks the pull requests associated with the session and shows the selected one's summary (reviewers, CI checks, and the PR description), its conversation comments, and a stacked diff with a file-tree navigator. Nothing is pushed or mutated — recording an association never touches the remote PR.
Tracked pull requests
Omnigent discovers a session's pull requests automatically by observing the
agent's completed GitHub work — gh CLI commands and GitHub MCP tool calls that
create, edit, review, merge, or comment on a PR. Each association is tagged with
how it was found:
- created — the session opened the PR.
- worked_on — the session edited, reviewed, merged, or otherwise acted on it.
- attached — you linked it manually (see below).
- inferred — matched from the current branch when the session has no
recorded PR yet; shown as
(from branch)in the selector.
Associations are stored on the host, independent of the current checkout, so they stay with the session even as its branch or worktree changes.
When a session tracks more than one PR, a selector at the top of the tab
switches between them; each entry reads owner/repo #number (prefixed with the
host for GitHub Enterprise). The details, changed files, and diff below are
always the selected PR's, fetched from GitHub — including fork PRs and renamed
files — so they match the PR's "Files changed" exactly.
When a file diff is computed from the local checkout instead, Omnigent diffs
HEAD against the merge base with the base branch. In a shallow or
single-branch clone (for example one created under an admin's
sandbox.git_clone
policy) a missing merge base or unfetched base branch produces an error naming
the git fetch command to run, rather than a misleading branch-tip comparison.
File content that cannot be read is also reported as an error, never shown as
an added or deleted file.
Summary tab
The Summary tab opens with a Reviewers section, followed by CI checks
and the PR description. Each assigned reviewer is listed with its current review
state — Pending, Approved, Commented, Changes requested, or
Dismissed. Team reviewers are marked (team). A reviewer whose review has
been re-requested shows as Pending even if they approved earlier. A PR with
no reviewers reads No reviewers assigned.
Reviewer data comes from the same gh pr view call as the rest of the PR. If
GitHub refuses the reviewer fields for the active token (or the host's gh is
too old to know them), Omnigent re-fetches the PR without them: the Reviewers
section is simply omitted and the summary, checks, and comments still load.
In the Comments tab, each author's avatar initial gets a distinct color within the thread so you can follow who said what at a glance.
Link or unlink a PR
Use the + (Link a PR) button to attach a pull request by URL — paste a
https://github.com/owner/repo/pull/123 link (GitHub Enterprise hosts work
too). The linked PR becomes an attached association and is selected. The
trash (Unlink PR) button removes the selected association; an unlinked PR
stays out of the list until you link it again, even if the agent keeps touching
it. When a session tracks no PRs yet, the tab's empty state offers the same
Link a PR action.
The composer status line mirrors this: it shows #123 for a single tracked PR
or N PRs when several are tracked, and clicking it opens the Pull Requests tab.
Mentioning workspace files
In a coding-agent session, type @ in the composer to browse and attach
workspace files and folders. Attached paths appear as chips above the input and
can be removed individually; the agent reads each one directly from disk at send
time.
Appearance settings
Open Settings → Appearance to tune how code renders. Separate from the chrome
(UI) font, two controls size and style the code editor (Monaco) and the
terminal (xterm) together:
- Code font size — a stepper (
−/ value /+, or type a value directly). Ranges from 10 to 24 px and defaults to 13 px. - Code font family — a free-text field: type the name of any monospace font
installed on your device. Leave it blank (or use
Reset) for the editor default, which falls back to the app's shared mono stack. A custom name that isn't installed degrades to that mono stack rather than a serif fallback.
Both settings apply live to any open editor or terminal — no reload or reconnect — and persist in your browser across refreshes and restarts.
Inline comments and addressing
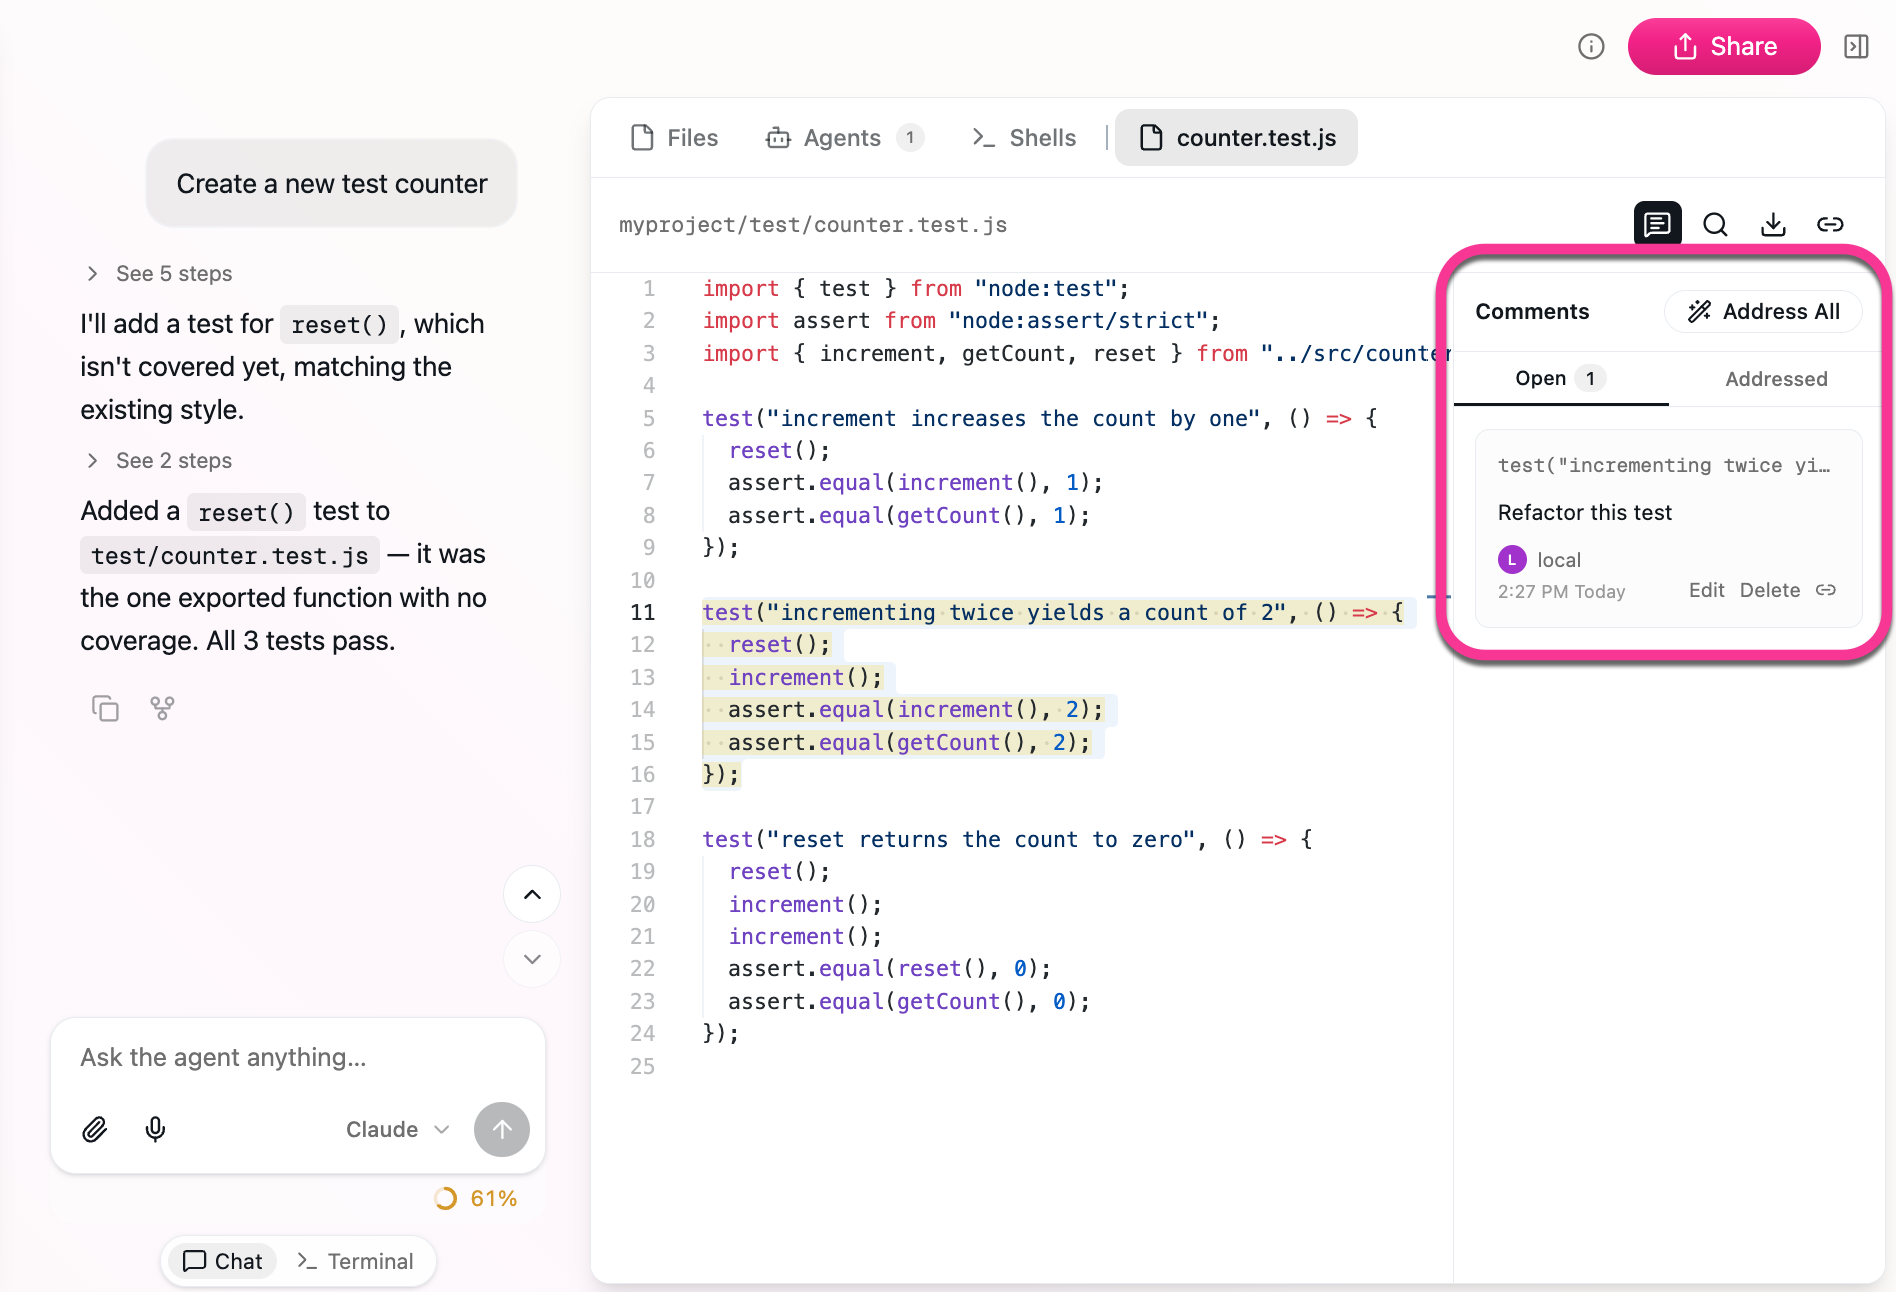
Instead of typing in chat "change the third paragraph to be more concise," you click on that paragraph and leave a comment: "too verbose, tighten this up." The Omnigent sees exactly what you're referring to and revises it.
Addressing closes the loop: resolve a comment and the Omnigent acts on the feedback. The workflow is: Omnigent proposes, you annotate, Omnigent revises.
The comments panel (Show comments in the file viewer toolbar) sorts comments
into two tabs, each with a count badge:
- Open — comments you've left that haven't been sent to the Omnigent yet.
- Sent — comments that have been dispatched to the Omnigent. Each card in
this tab carries a
Sentstatus label. (This tab was previously labelled Addressed; the underlying comment status is stilladdressed.)
Address All sends every open comment to the Omnigent in a single message and
moves them from Open to Sent. When a comment's status changes from
elsewhere, its card moves tabs live — no reload needed.
Where this matters most:
- Reviewing plans before execution. Annotate the steps you want changed before the Omnigent starts building.
- Editing drafted docs. Leave line-level feedback instead of rewriting in chat.
- Iterating on configs. Flag the fields that need adjustment.
Multi-modal input
Paste images, screenshots, diagrams, and mockups directly into the conversation. The Omnigent sees them alongside your text. Useful for frontend work where describing a layout issue in words is slower than screenshotting it.
Attach archives, Office documents, and databases
Besides images, PDFs, and text/code files, the composer accepts ZIP archives
(.zip), Office documents (.docx, .xlsx, .pptx), and SQLite databases
(.db, .sqlite, .sqlite3). Drop them on the composer or pick them with the
attach button — the file picker filter includes these extensions. They appear as
ordinary file cards showing an icon, filename, type, and size; images keep their
thumbnail and preview.
These formats are classified by filename extension, not by the MIME type the
browser reports, so a .docx that the browser labels as a ZIP still attaches
correctly. Anything outside the supported set (audio, video, unrecognised
binaries) is rejected with an inline error.
Harness requirement. These files need a harness that can open local files:
Claude Code (claude-native) or Codex (codex-native), running on an
up-to-date host/runner. On other harnesses the upload is rejected; the server
suggests attaching images, PDF, or text/code files instead, or switching to
Claude Code or Codex.
Size limits. The web composer caps each of these files at 50 MiB. Server operators can lower the per-file limit, cap the number and combined size of such files per session, or deny specific extensions — see Attachment limits. Images, PDFs, and text/code files keep their existing separate limits.
Message queue and steering
Type a follow-up while the agent is still working and it's held in a client-side queue instead of interrupting the turn. Queued messages appear in a docked strip above the composer, and drain automatically — one at a time, in order — as soon as the session goes idle.
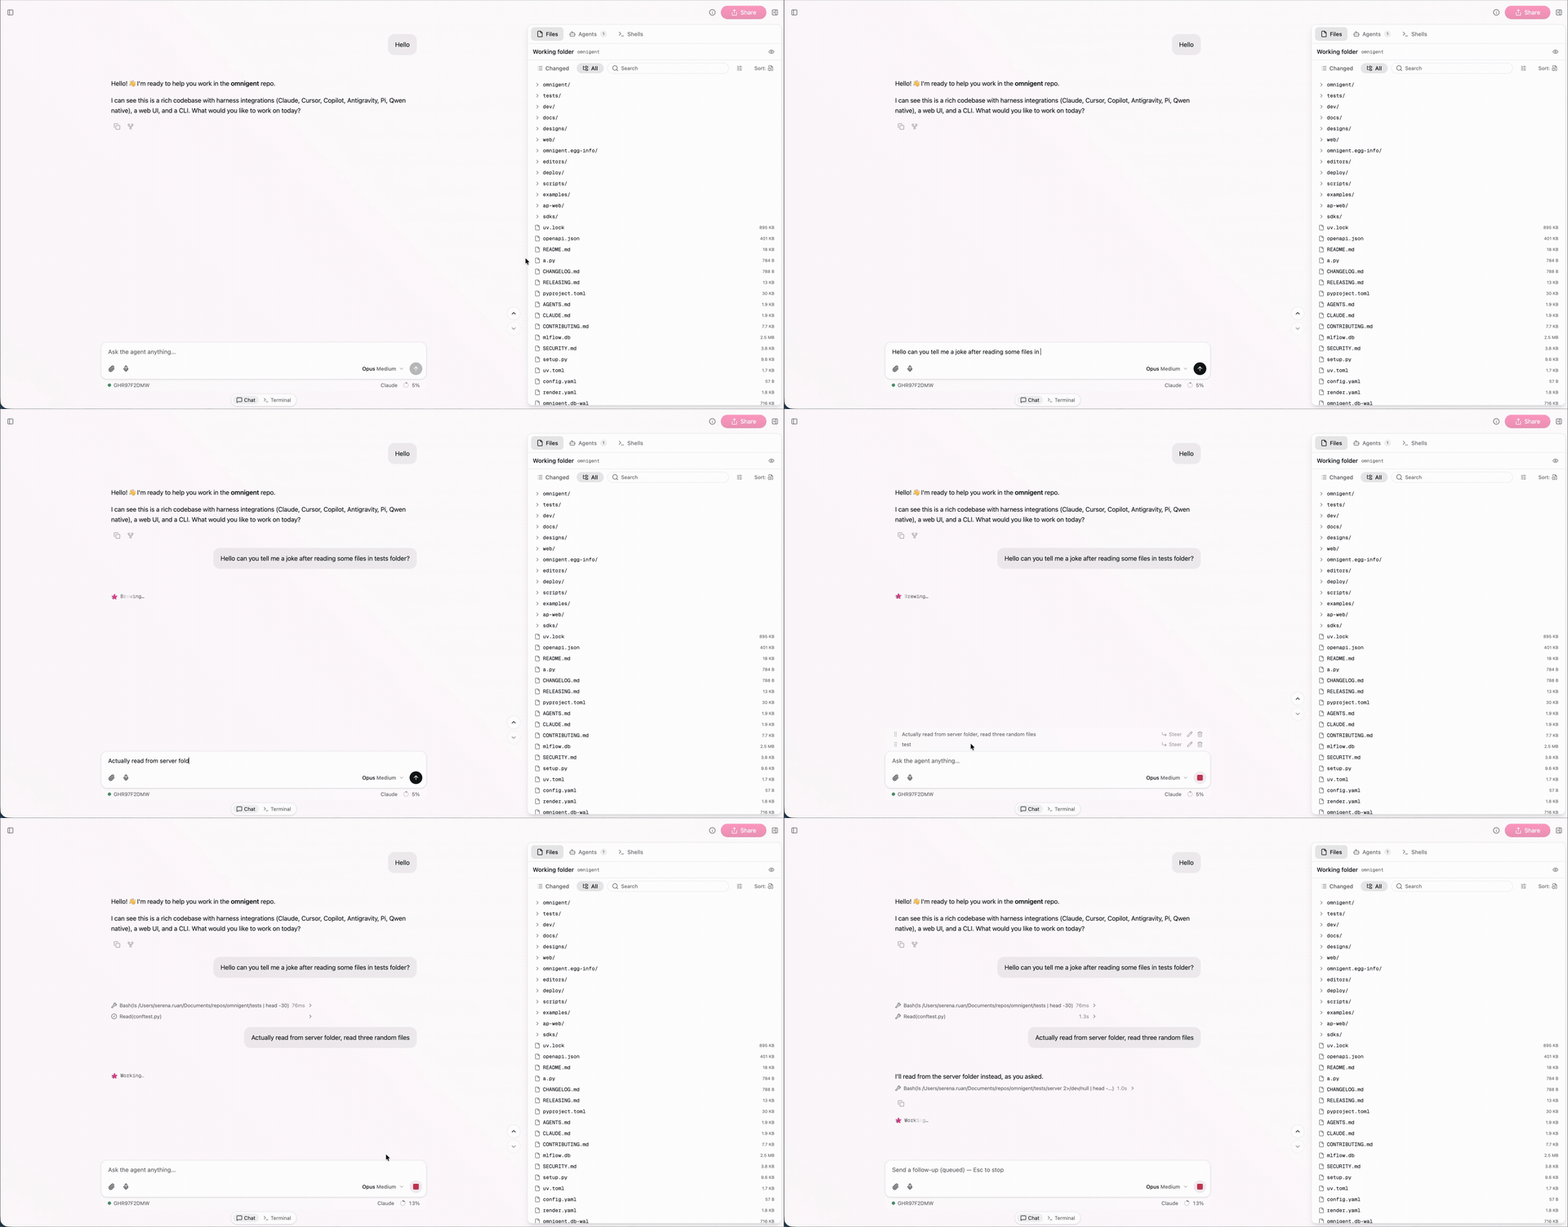
Each queued row has inline actions:
- Steer — send the message now, mid-turn, instead of waiting for the queue to flush.
- Edit — pull the message back into the composer to revise it.
- Delete — drop the message from the queue.
Side chats
A side chat lets you ask the agent something off to the side of a conversation
— with the agent's full context — without adding anything to the main
transcript. Side chats work on every harness. Each one opens as its own tab
(Side chat 1, Side chat 2, …) in the right Workspace rail, beside the
still-active main chat: you stay in the main conversation while the side chat
streams next to it. The rail opens automatically when a side chat starts.
Start one from any of these places:
- Type
/side <question>in the composer. The/siderow appears in the composer's slash menu on every harness; the menu lists each command and skill with its description inline. - Open the composer's
+tray and choose Start a new side chat (under Session). - Open the Workspace rail's
+(Open new) menu and choose Side chat. This opens an empty side-chat tab first; the side chat itself is created when you send its first message there. - Select text in a reply and choose Ask in side chat — the quoted selection and your question are sent to the side chat instead of the main conversation.
Inside the tab you get a scoped composer (attachments and dictation included). Follow-ups go to the side chat, not the main conversation, and any approval request the agent raises there is answered there too. The side chat starts visually empty — the history it inherited from the parent is hidden — but the agent has the parent conversation's full context.
Slash commands in a side chat
The side-chat composer opens the same / menu as the main composer, with a
narrower set of entries: /help plus the session's skills. Skills are
discovered against the parent session's host and workspace, so the list matches
what the main composer offers. Built-ins that act on the main session (/model,
/compact, …) are not listed.
/helpis handled locally in the side chat: it prints the available commands and their descriptions above the composer and is never sent to the agent as a turn. Choosing its menu row (or pressing Enter) runs it immediately; Tab only completes the text into the draft so you can edit it before sending./<skill> [arguments]invokes that skill in the side chat through the sameslash_commandpath as the main composer, rather than forwarding the text as plain prose. A slash-command receipt card records the invocation and stays visible after the skill's reply lands, even when the rest of the turn's tool work folds behind the Worked row. If skill discovery is still in flight when you submit a lone/<skill>, the submission is held until the catalog resolves instead of leaking to the agent as plaintext.- A multi-word skill whose first word collides with a built-in (for example
/help desk …) still runs as the skill; a skill named exactlyhelpcan't be invoked because the built-in wins, so it is left out of the menu.
The menu and local routing apply only to in-process harnesses. In a native
terminal side chat (claude-native, codex-native) no menu opens and slash
text is sent as-is to the vendor TUI, which reads it itself. A message carrying
a quote or an attachment is always sent as an ordinary message, and the menu
stays closed on an empty side-chat tab that hasn't created its session yet.
How a side chat is created
- Codex (
codex-native) forks in-process using its native ephemeral/sidefork, so the fork stays warm on Codex's prompt cache. Because that fork lives with the parent's runner process, a Codex side-chat tab restored after an app restart points at a thread that no longer exists: it opens read-only, showing its transcript with the notice This side chat has ended and can't be continued. - Every other harness forks the conversation server-side (a
POST /v1/sessions/{id}/forkwith"side_chat": true) and launches a runner for the fork on the same host as the source session — local or managed, with no new sandbox. When the source session is on a git branch, the fork runs in its own worktree on aside-chat/<id>branch cut from the source branch, so it never touches the parent's working tree; otherwise it runs in the source's workspace. If the session has no host or workspace to launch on, or the fork fails, a toast reads Couldn't start a side chat for this session. and your typed question stays in the composer so you can retry.
A side chat is otherwise a normal session with its own runner and transcript,
but it is stamped with the omnigent.side_chat label and hidden from the left
sidebar's session list — it surfaces only as a rail tab.
Side-chat tabs
Side-chat tabs are stored in your browser, like the rail's file and browser
tabs: they survive reloads and restarts on this device but don't follow you to
another device. Switching to another conversation shows that conversation's own
side-chat tabs. Close a tab with its ✕ (or a middle-click) to stop the side
chat's runner and drop the tab.
Side chats are distinct from Claude Code's /btw overlay (below), which answers
a one-off question inline without creating a session.
Side chats with /side
In a Codex (codex-native) session, type /side <question> in the composer to
start a side chat — an ephemeral fork of the current Codex thread. The
composer's slash menu offers /side only on Codex sessions; selecting it
pre-fills /side so you can type your question after it.
Unlike /btw, a /side question is not answered in a throwaway overlay. It
opens as its own sub-agent chat, labelled Side chat, so you can navigate
into it and keep the conversation going over multiple turns. It never appears in
the left conversation sidebar, and the main Codex conversation keeps running
unchanged the whole time.
The fork inherits the parent thread's history as reference context only —
the side chat is told to treat that history as background, not as active
instructions — so you can ask about the work so far without steering the main
thread. The /side message itself stays out of the parent conversation: it's
routed straight into the fork and leaves no bubble in the main transcript.
Side chats are ephemeral: nothing is written to disk, so a side chat is not
resumable after a runner restart. If a /side request can't be opened, the
session posts a visible notice so the question is never silently dropped.
You can also start a side chat from selected text. Select part of a message and
choose Ask in side chat: the selection is added as a quote card, and when
you send, it's forwarded as a /side command carrying the quoted text and your
question. On a harness without side-chat support this action degrades to an
ordinary quoted reply in the main chat.
Side chats with /side
Side chats work on every harness. A side chat forks the conversation into a new session titled Side chat and opens it as a tab in the right Workspace rail, so you can ask a tangent question with the full context of the parent conversation without adding anything to the parent's transcript. The parent stays on its own page and its history is untouched; the side chat's messages are saved only on the forked session.
There are three ways to start one:
- Type
/side <your question>in the composer and send it. The slash menu offers/sideon every session. - Pick Start a new side chat from the composer's
+tray. - In the rail, click Open new (
+) and choose Side chat, then type your question in the side-chat pane.
The side chat runs in the parent's current working directory — it shares the parent's workspace rather than cutting its own git worktree, and a branch saved on the parent (for example, from a worktree created on another machine) is neither required nor reused. Where it runs depends on how the parent is placed:
- Hosted sessions (bound to a host and workspace) launch a separate runner for the fork on the parent's host, in the parent's workspace.
- CLI sessions with an online runner but no host reuse the parent's existing runner.
- In-process sessions with neither a host nor a runner use normal server dispatch.
If the parent is on a dormant resumable managed host, starting a side chat wakes the host first and then launches on the refreshed placement. If neither the parent's host nor its runner is reachable, the side chat isn't created and the composer shows This session is disconnected. Reconnect it before starting a side chat.
Closing a side-chat tab stops the forked session only; the parent keeps
working and you can continue chatting in it. Codex native sessions handle /side
natively (an in-process fork) instead of using this generic flow.
Scheduled tasks
Run an agent on a recurring schedule instead of starting each session by hand. A scheduled task is a saved prompt plus a recurrence rule: it fires automatically, runs the chosen agent, and keeps firing until you delete it.
To create one manually, open the New scheduled task dialog and fill in:
- Name — a label for the task (for example,
Nightly triage). - Prompt — the instruction the agent receives on every run.
- Runs with — the agent or harness to run. Scheduled tasks use that agent's default model, effort, and permission settings; there are no per-task model or effort overrides in this dialog.
- Frequency — one of four presets: Hourly, Daily, Weekdays, or Weekly. Hourly fires once an hour and asks only for the minute of the hour; Daily and Weekdays ask for a time; Weekly adds a weekday multi-select (On days). Times are chosen in 15-minute steps. The schedule is evaluated in your browser's local timezone.
- Host (optional) — pin the task to a specific connected host, or leave it set to Resolve at fire time to run on your connected host whenever the task fires. When the server has managed sandboxes configured, the picker also offers New Sandbox (labelled with the provider's name, e.g. Modal Sandbox): each run then provisions a fresh sandbox instead of using a connected host, and the sandbox's shutdown follows the server's sandbox configuration. Existing sandbox hosts can't be pinned.
- Workspace (optional) — shown only once a connected host is pinned. Pick a directory to pin it; leave it unset to default to the host's home directory. A workspace can't be set without a host, and doesn't apply to sandbox runs.
The Create task button stays disabled until Name, Prompt, a valid schedule, and an agent are all set.
Collaboration
Share your session with teammates for real-time co-driving. Multiple people see the same conversation, leave comments, and interact with the Omnigent simultaneously.
See Pair Programming for details on sharing, permissions, and multi-user workflows.